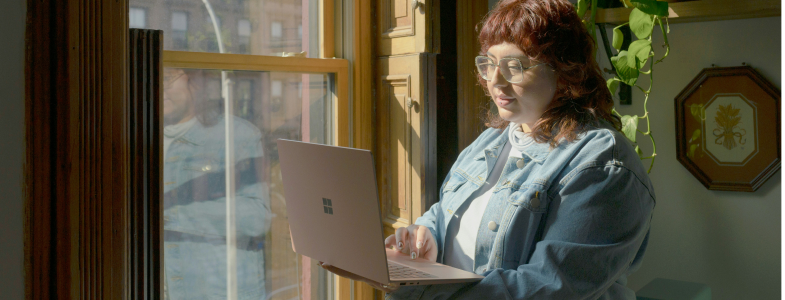
From project managers outlining workflow processes, web developers showcasing coding tutorials, QA engineers documenting bug reports, to stock traders recording market analysis and freelancers creating content—video recordings serve as a dynamic medium to communicate, instruct, and present information effectively. The ability to capture screen movements, audio, and real-time interactions makes it a versatile solution for professional documentation and communication needs.
To navigate through the multitude of video recording methods available on Windows laptops, we’ve compiled a comprehensive guide that outlines the most effective and user-friendly tools tailored for professional use. Below is a table summarizing the methods covered, ensuring you find the right tool for your recording needs with ease.
|
Method
|
Description
|
|
Screenpixel
|
A quick, efficient tool for screen recording with easy sharing capabilities.
|
|
Xbox Game Bar
|
Windows' built-in feature for game and screen recording.
|
|
Clipchamp
|
A versatile screen recording and video editing tool.
|
How Do I Screen Record on My Laptop?
How to Create a Video on a Laptop with Screenpixel
Screenpixel stands out as a remarkably convenient tool for creating screen videos, renowned for its swift installation and ease of use. Here’s how you can start leveraging Screenpixel for your professional screen recording needs:
-
Quick Installation: Navigate to the Screenpixel website and download the application. The installation process is straightforward, allowing you to set up the tool in just a few clicks.
-
Recording Made Simple: With Screenpixel, initiating a screen recording is as easy as pressing CTRL + two mouse buttons. This action allows you to select the specific area of your screen you wish to record.

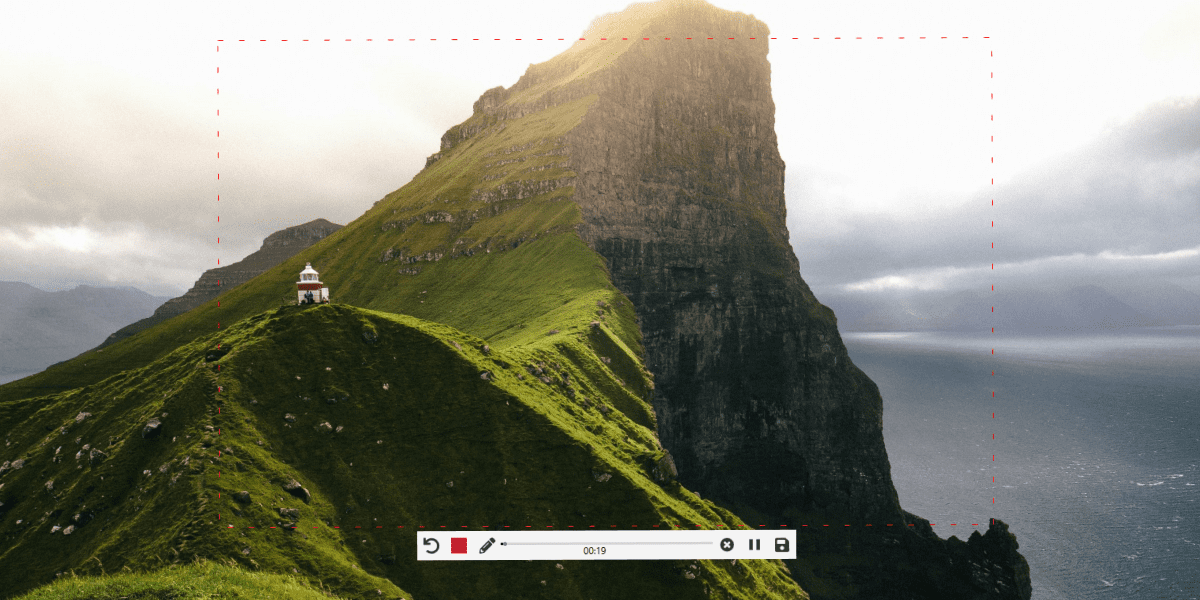
-
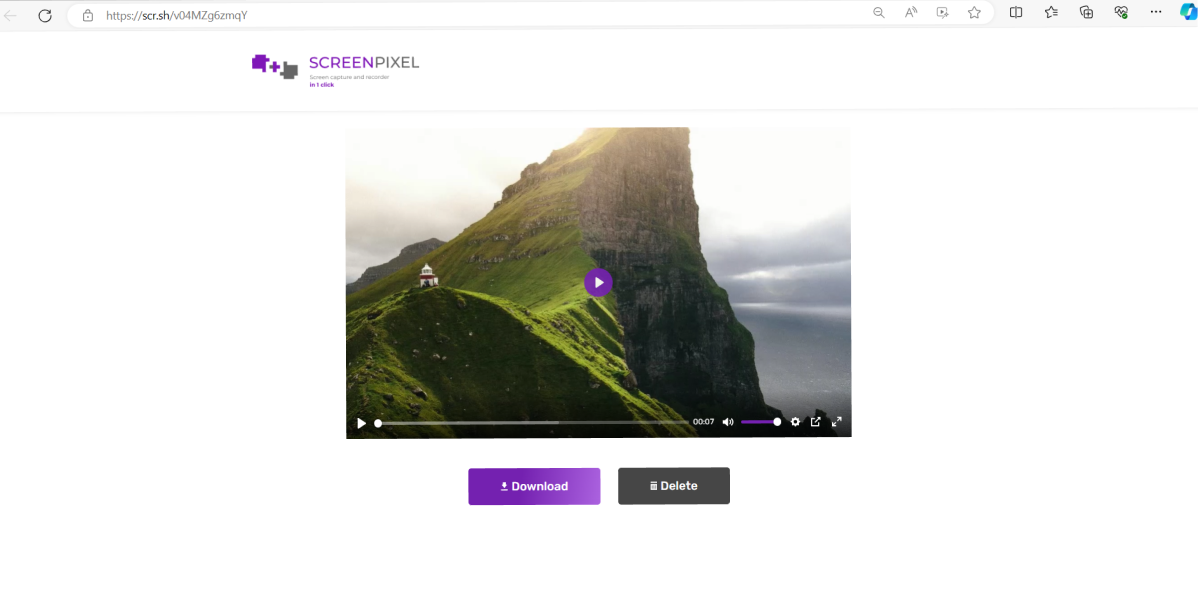
Instant Sharing: Once your recording is complete, simply press Enter. Screenpixel automatically generates a short link to your video, copying it to your clipboard for easy sharing. This feature is particularly useful for professionals who need to share their recordings quickly with team members or clients.
Screenpixel’s efficiency and user-friendly design make it an invaluable tool for professionals looking to streamline their workflow and enhance their communication with clear, concise screen recordings.
How to Make a Video on a Laptop Using Xbox Game Bar
The Xbox Game Bar is another effective solution for screen recording on Windows laptops, especially built into the Windows 10 and 11 operating systems. Here's how to utilize it:
-
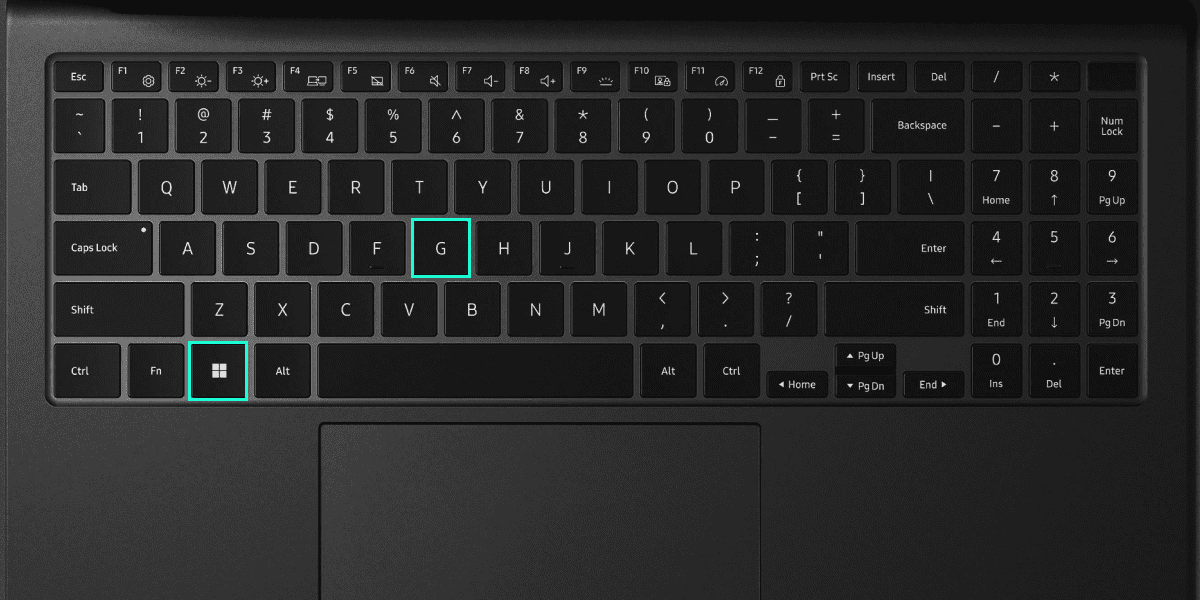
Accessing Xbox Game Bar: Simply press the Windows key + G to open the Game Bar overlay while in the application you wish to record.
-
Starting the Recording: Click on the record button or press Windows + Alt + R to start and stop recordings.

While the Xbox Game Bar is primarily designed for gaming, its screen recording function can be harnessed for various professional uses. However, it’s worth noting its limitations, such as a lack of advanced editing features and the potential for performance impact on lower-spec laptops, which might not suit all professional applications.
How to Make a Video on a Laptop Using Clipchamp
Clipchamp combines screen recording with video editing features, offering a streamlined solution for producing videos of professional quality. Here's a detailed guide on how to use Clipchamp for screen and webcam recording:
Setting Up Clipchamp
-
Access: Open Clipchamp by creating a new account or logging into your existing one.
-
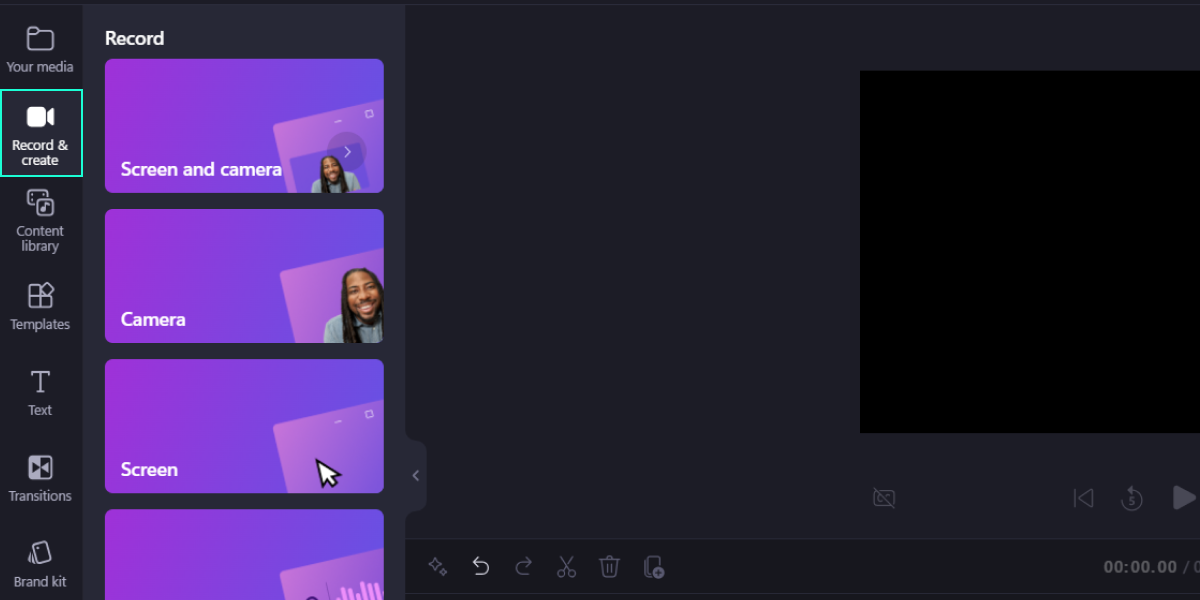
Navigate: Find the Record & Create tab on the toolbar, which houses the screen recording feature.
Preparing for Recording
-
Select Recording Mode: Click on the Screen and Camera button to activate both webcam and screen capture options.

-
Permission: Allow Clipchamp to access your camera and microphone if prompted, ensuring a smooth recording experience.
Recording Your Screen and Webcam
-
Choose Sources: Select your preferred audio source (microphone), video source (webcam), and whether you'd like to use speaker coach features.
-
Start Recording: Hit the red record button to commence recording. You can record your browser tab, a specific application window, or your entire screen. Your webcam feed will appear in the corner of the recording interface.
-
Duration: Remember, the tool allows for up to 30 minutes of recording per session. For longer content, simply initiate multiple recordings.
Editing Your Recording
-
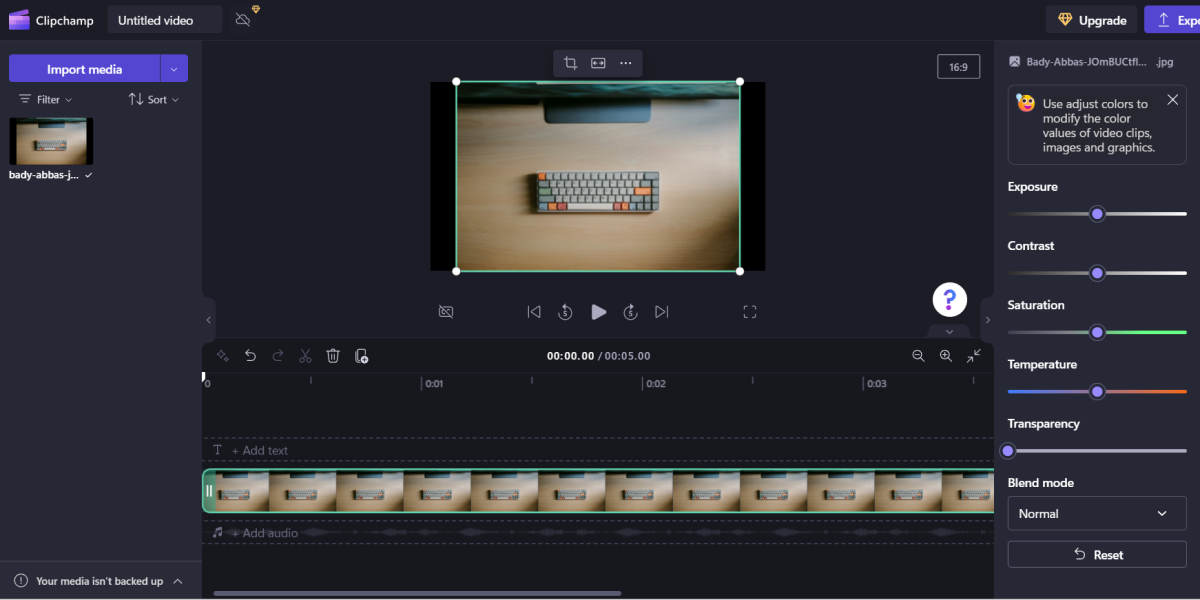
After recording, Clipchamp offers a suite of editing tools. Trim your video, adjust audio settings, or add visual elements like filters and stickers.
-
Personalize: Utilize the brand kit feature to add logos, custom colors, and watermarks, ensuring consistency across your videos.
-
Enhance: Apply adjustments to your webcam's video quality by tweaking exposure, saturation, or adding filters for a polished look.
Saving and Sharing
-
Preview: Review your recording and make any necessary edits.
-
Save: Once satisfied, save your project and utilize Clipchamp's sharing integrations to distribute your video across platforms like YouTube, TikTok, or professional networks.
How to Record a Video on Windows Using a Laptop Camera
Make a Video with the Windows Camera App
Recording videos using your laptop's built-in camera on Windows has never been easier, thanks to the Windows Camera App. This pre-installed application offers a straightforward way to create videos for various professional and personal purposes. Here's how to get started:
-
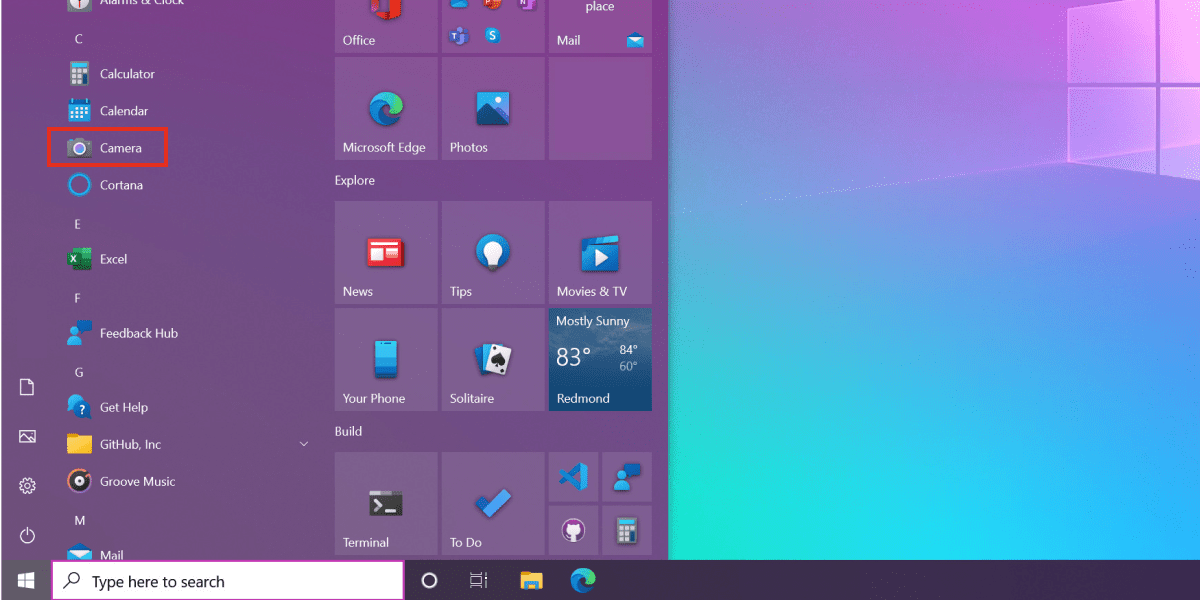
Accessing the Windows Camera App: Search for the Camera app in the Start menu and open it. You'll find the interface intuitive, with icons for switching between photo and video modes.
-
Recording Videos: To start recording, switch to video mode and click the video camera icon or press the spacebar. The app allows you to record as long as you need, saving the video automatically in your Videos folder.
-
Optimizing Video Quality: For the best video quality, ensure your room is well-lit and adjust the app's settings, such as video resolution and frame rate, according to your needs. Position your laptop at eye level to achieve a natural, engaging perspective.
The Windows Camera App is ideal for quick video recordings, whether you’re preparing a short presentation, creating content, or documenting a process. Its simplicity and accessibility make it a go-to choice for many professionals.
Record Yourself with Clipchamp
For those seeking more advanced features in video recording and editing, Clipchamp offers a comprehensive solution. Here's how to leverage Clipchamp for personal and professional video recordings using your laptop's camera:
Getting Started with Clipchamp
-
Access the Platform: Open your web browser and go to the Clipchamp website. Proceed to create a new account or log into an existing one to get started.
-
Initiate Your Project: Locate the Create a Video button. This action grants you access to Clipchamp's array of recording features, setting the stage for your video project.
Recording Your Video
-
Camera Setup: Within the Clipchamp editor, select your laptop's built-in camera as the input device. This step is crucial for ensuring that Clipchamp utilizes the correct video source for recording.
-
Start Recording: With the camera selected, you're now ready to record. Hit the recording button to capture your video directly within the Clipchamp interface, creating a seamless recording experience.
Enhancing Your Video
-
Edit for Impact: Post-recording, Clipchamp's editing suite becomes your playground. Trim excess footage to tighten your video's pacing, or add textual elements to convey key messages effectively.
-
Incorporate Effects: Elevate your video with Clipchamp's array of effects. From subtle filters to dynamic transitions, these tools help in adding a layer of sophistication to your content.
-
Adjust the Audio: Fine-tune your video's audio track with Clipchamp's audio adjustment tools. Whether it's lowering background noise or adding a musical overlay, these features assist in achieving the perfect auditory balance.
Clipchamp stands out for its versatility and editing capabilities, making it suitable for professionals who need more than just basic video recordings. Whether it’s for detailed tutorials, client presentations, or engaging content creation, Clipchamp provides the tools necessary to produce high-quality videos.
Conclusion
Throughout this guide, we’ve explored various methods on how to do a screen recording on a laptop, catering to a wide range of needs from simple screen recordings to more complex video productions using the laptop camera; these tools offer the flexibility and efficiency required to communicate and document your work effectively.
FAQ
-
What is the easiest way to record a video on a laptop?For those seeking simplicity and efficiency in video recording on a Windows laptop, Screenpixel and the Windows Camera App stand out as the most straightforward options. Screenpixel is exceptionally user-friendly for screen recordings, allowing quick capture of your desktop with just a few clicks.
Meanwhile, the Windows Camera App provides an effortless way to record videos using your laptop's camera—ideal for when you need to capture footage of yourself or your surroundings. Both tools are designed with ease of use in mind, ensuring you can start recording without navigating through complex settings. -
How do I take a short video on my laptop?Taking a short video on your laptop can be accomplished easily with the right approach:
● Quick Setup: Open the Windows Camera App for personal recordings or Screenpixel for screen captures. Both are designed for swift initiation of video recording.
● Plan Ahead: Know what you intend to capture or discuss in your video. A clear objective helps in keeping the video concise.
● Record with Purpose: Start recording, keeping your content focused and to the point. Aim for short segments if the video's purpose is instructional or informational, to retain viewer engagement.
● Edit if Needed: Use an editing tool like Clipchamp to trim any unnecessary parts from the beginning or end, ensuring your video remains direct and impactful. -
How do I record a video with audio on Windows?To ensure your video recordings on Windows include audio, follow these steps:
● For Screenpixel: Make sure you've selected the option to include audio in your screen recordings. Screenpixel allows you to capture system sounds or microphone audio, so choose the appropriate source before starting your recording.
● For Windows Camera App: This app automatically captures audio through your laptop's built-in microphone during video recordings. You can check the microphone settings in the Windows Sound settings to ensure it's enabled and set as the default device.
● General Tip: Always perform a quick test recording to verify that the audio is being captured correctly. Adjust the microphone's position or settings if necessary to improve sound quality. -
Where do the created videos go?The location where your videos are saved depends on the recording tool you're using:
● Screenpixel: After recording, Screenpixel provides a direct link to your video, which is stored online. You also have the option to download the video to your preferred location on your laptop.
● Windows Camera App: Videos recorded with the Camera App are automatically saved in the "Camera Roll" folder within your "Pictures" library. You can access and move these files to any location on your laptop or external storage.
● Clipchamp: For videos created and edited in Clipchamp, you'll be prompted to choose a save location upon exporting your project. Clipchamp also offers cloud storage options for easy access and sharing.
